Download the complete source code here or follow me along below to develop it from scratch.
Start a new Swift UI project and replace contents of the VStack in the body of the ContentView like this:
    var body: some View {
        VStack {
            Text("Drag and drop an image here.")
                .font(.headline)
                .frame(maxWidth: .infinity, maxHeight: .infinity)
                .background(Color.gray.opacity(0.3))
        }
    }
By specifying .infinity for maxWidth and maxHeight in the .frame modifier we let the system choose some meaningful default size for the app window. This will also dynamically adjust the window to the size of the image that we are going to drop into the window.
Now let’s add some conditional logic that will display an image once it’s dropped into the window.
We start with a view model that will also act as a DropDelegate to react to drop events and look for an image in the dropped items.
import SwiftUI

@Observable
class InputImageViewModel: DropDelegate {
    var image: NSImage?

    func performDrop(info: DropInfo) -> Bool {
        // To be fleshed out
        return true
    }
}
We want the view model to be @Observable (this property wrapper is available starting with iOS 17) so that the view could react to change of its image property which will be set from the dropped image.
Now let’s adds the conditional logic and the drop handler to the ContentView
struct ContentView: View {
    @State private var viewModel = InputImageViewModel()
    var body: some View {
        VStack {
            if let image = viewModel.image {
                Image(nsImage: image)
                    .resizable()
                    .aspectRatio(contentMode: .fit)
            } else {
                Text("Drag and drop an image here.")
                    .font(.headline)
                    .frame(maxWidth: .infinity, maxHeight: .infinity)
                    .background(Color.gray.opacity(0.3))
            }
        }
        .onDrop(of: [.image], delegate: viewModel)
    }
}
We have to add @State property wrapper to the var viewModel so that the view gets reloaded when the viewModel properties change.
Now let’s go back to the InputImageViewModel and flesh out the DropDelegate method.
    func performDrop(info: DropInfo) -> Bool {
        // Check if there are items conforming to the specified types
        guard let provider = info.itemProviders(for: [.image]).first else { return false }
        _ = provider.loadDataRepresentation(for: .image) { data, error in
            if let error = error {
                print("Error loading dropped item: \(error.localizedDescription)")
                return
            }

            if let data {
                DispatchQueue.main.async {
                    self.image = NSImage(data: data)
                }
            }
        }
        return true
    }
Take a note that we are assigning image property on the main thread. If we take it out of the DispatchQueue.main.async block we will get compile error:

While the error message may sound somewhat confusing, suffices to say that SwiftUI views can only be modified on the main thread. Which means that the @Observable class should only send its property updates on the MainThread as well. And since loadDataRepresentation completion block can be called on any thread, compiler helps us enforce this requirement.
Build and run the app now. Drag and Drop any image from your computer to the all window and make sure it’s getting displayed.
Now let’s start building out the scaffolding for running the dropped image through the CIKMeans filter and visualizing the results.
Before we do that let’s add ImageUtils.swift to the project that you can find in the downloaded source code under Utils folder. It contains some useful image processing helpers we will be using.
Go ahead and create ImageProcessor class that will handle running the image through the filter. For now it will just pass the input image through.
Since CIFilters work with CIImages we will be passing CIImage to it. We also want to make the ImageProcessor class @Observable so that the view that will show the processed image can be bound to the changes of the property where it’s exposed.
import SwiftUI
import CoreImage

@Observable
class ImageProcessor {
    var outputImage: NSImage?

    func processImage( _ ciImage: CIImage) {
        outputImage = ciImage.asNSImage()
    }
}
asNSImage() is one of those helper functions you find in the downloaded ImageUtils.swift file.
Go back to the ContentView and add a @State property of that type.
struct ContentView: View {
    @State private var imageProcessor = ImageProcessor()
    @State private var viewModel = InputImageViewModel()
Add a conditional logic to display the processed image alongside the input image.
    var body: some View {
        VStack {
            if let image = viewModel.image {
                HStack {
                    Image(nsImage: image)
                        .resizable()
                        .aspectRatio(contentMode: .fit)

                    if let outputImage = imageProcessor.outputImage {
                        Image(nsImage: outputImage)
                            .resizable()
                            .aspectRatio(contentMode: .fit)
                    }
                }
            }
Now add ciImage property to the InputImageViewModel and set it from the same data that we have obtained in the DropDelegate handler..
@Observable class InputImageViewModel: DropDelegate {
    var image: NSImage?
    var ciImage: CIImage?

    func performDrop(info: DropInfo) -> Bool {
        // Check if there are items conforming to the specified types
        guard let provider = info.itemProviders(for: [.image]).first else { return false }
        _ = provider.loadDataRepresentation(for: .image) { data, error in
            if let error = error {
                print("Error loading dropped item: \(error.localizedDescription)")
                return
            }

            if let data {
                DispatchQueue.main.async {
                    self.image = NSImage(data: data)
                    self.ciImage = CIImage(data: data)
                }
            }
        }
        return true
    }
}
Last but mot least add the onChange handler to the ContentView to call the imageProcessor whenever the ciImage property of the InputImageViewModel changes.
    var body: some View {
        VStack {
            if let image = viewModel.image {
                HStack {
                    Image(nsImage: image)
                        .resizable()
                        .aspectRatio(contentMode: .fit)

                    if let outputImage = imageProcessor.outputImage {
                        Image(nsImage: outputImage)
                            .resizable()
                            .aspectRatio(contentMode: .fit)
                    }
                }
            } else {
                Text("Drag and drop an image here.")
                    .font(.headline)
                    .frame(maxWidth: .infinity, maxHeight: .infinity)
                    .background(Color.gray.opacity(0.3))
            }
        }
        .onDrop(of: [.image], delegate: viewModel)
        .onChange(of: viewModel.ciImage) { _, newValue in
            if let newValue {
                imageProcessor.processImage(newValue)
            }
        }
    }
Build and run the and drag and drop some image to it. You will see two copies of the original image stacked horizontally.
For some images the second image may end up being rotated. This is because when creating CIImage from data we didn’t tell it to honor the orientation property. While it doesn’t really matter for the final output we are going to render here in a minute, we can fix that by adding corresponding option to the CIImage initializer:
            if let data {
                DispatchQueue.main.async {
                    self.image = NSImage(data: data)
                    self.ciImage = CIImage(data: data,
                                           options: [.applyOrientationProperty: true])
                }
            }
OK, now comes the interesting part – we are going to visualize the output of the CIKMeans filter instead of passing the input image through.
For starters let’s just run the input image through the filter and render the output as is. We will keep all default settings except one – we want to run the entire image extent through the filter.
func processImage( _ ciImage: CIImage) {
let outputImage = ciImage.applyingFilter("CIKMeans", parameters: [
kCIInputExtentKey: CIVector(cgRect: ciImage.extent)
])
self.outputImage = outputImage.asNSImage()
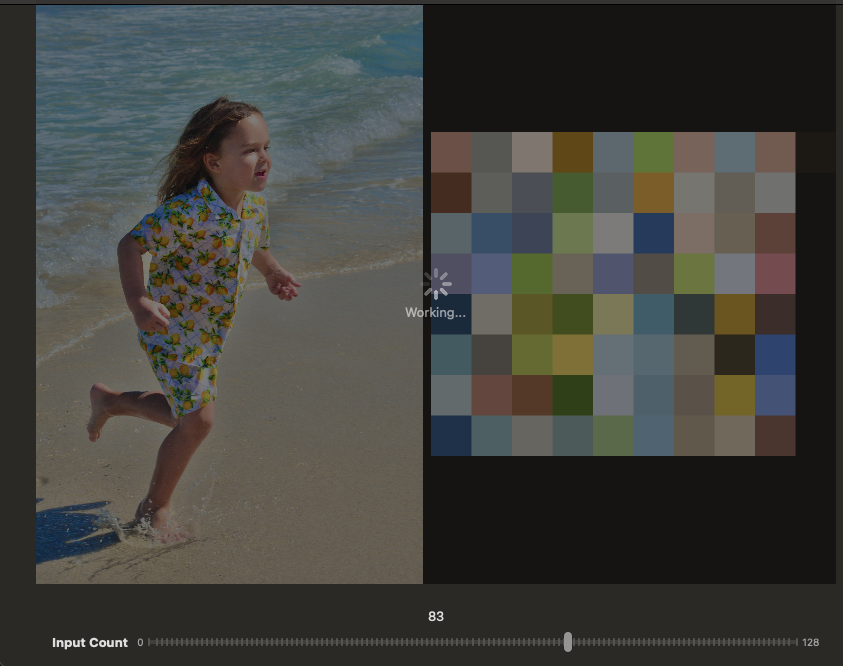
}If we give it a try we will see something like this:
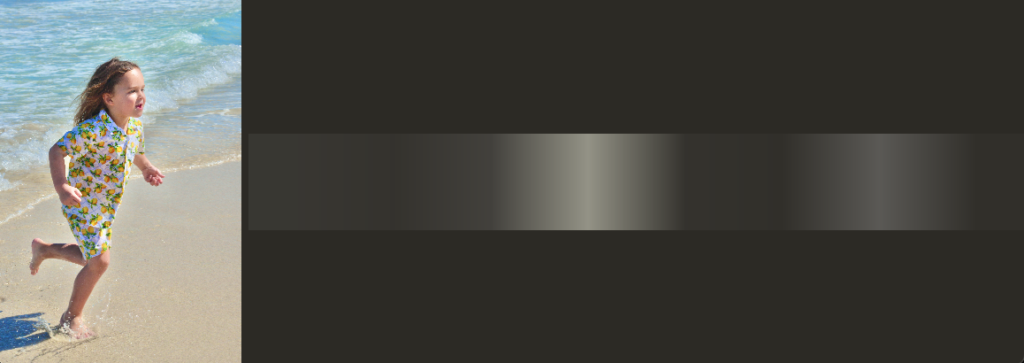
We were expecting to see 8 palette colors but instead we see a continuous smudge of shades of gray. Why is that?
First of all, one of the things that the documentation fails to mention is that the output image is not opaque. Every pixel of the output will have some transparency to it. I couldn’t conjure a reason why it’s the case. Maybe some additional information is conveyed in the alpha channel (cluster size?), but it certainly messes up the colors when rendered. We can easily fix it by making output image opaque like this:
self.outputImage = outputImage
.settingAlphaOne(in: outputImage.extent)
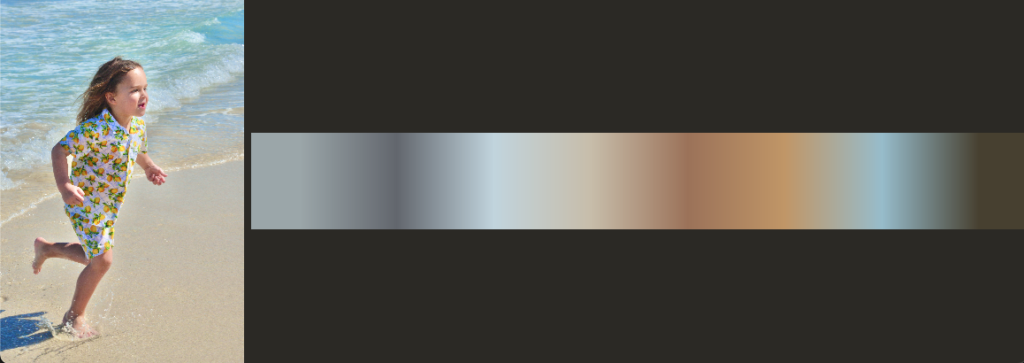
.asNSImage()OK, now it’s looking better, at least the colors of the output seem to be part of the same gamut as the input:
Still, we woudl like to see 8 distinct colors (8 is the default value of the "inputCount"), not a smudge of colors like this.
The issue is that the output image is very small – 1 x 8 pixels – and when scaled up for display it gets interpolated like this.
If we don’t resize it for display:
                        Image(nsImage: outputImage)
//                            .resizable()
                            .aspectRatio(contentMode: .fit)
we won’t see much because the image is just way too small.
To make it look right we can add these two lines of code:
        self.outputImage = outputImage
            .settingAlphaOne(in: outputImage.extent)
        // Disable interpolation so that it maintains clear separation between colors
            .samplingNearest()
        // Blow up each pixel 50x
            .scaledUniform(50)
.asNSImage()-
.samplingNearest()disables interpolation, so that when the image is scaled up byCoreImageit simply duplicates the pixels instead of interpolating across the neighboring pixels .scaledUniform(50)is a helper method that applies built-inCoreImagescale transform to the image uniformly along X and Y axes blowing it up by the factor of 50. Essentially every pixels is blown up into 50×50 square. It’s important to do this scaling within the CoreImage domain, chained after the.samplingNearest(), so that the scaling up is performed the way we want.
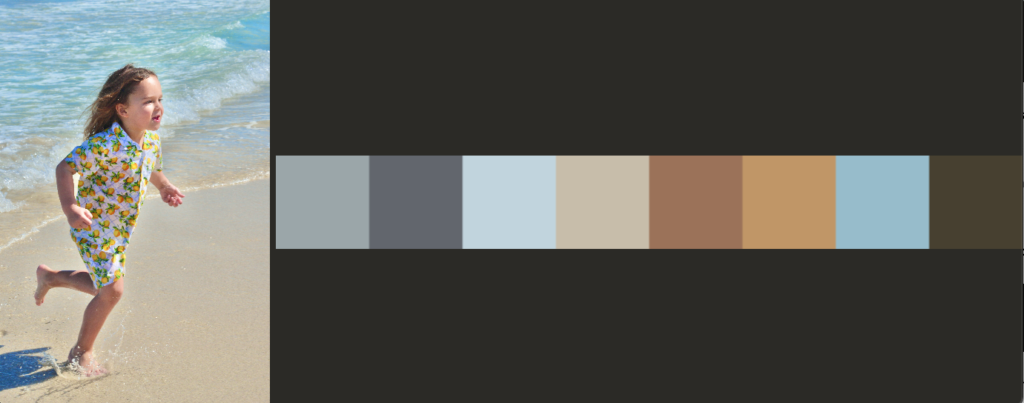
Now if we run the app we start to see something meaningful:
You still see some blurring around the edges of the squares. This is because when the rendered NSImage is stretched to the window size it does so with interpolation and there is no way (or maybe there is) to disable that. You can reduce the blurring by scaling up the CIImage output even more before rendering to NSImage.
I also would like to render the output vertically to make the UI more compact. I can easily do that by making use of another helper method which is a very thin wrapper over the built-in transformed(by:) method:
        self.outputImage = outputImage
            .settingAlphaOne(in: outputImage.extent)
        // Disable interpolation so that it maintains clear separation between colors
            .samplingNearest()
        // Blow up each pixel 50x
            .scaledUniform(50)
        // Make it vertical
            .rotated(.pi / 2)
            .asNSImage()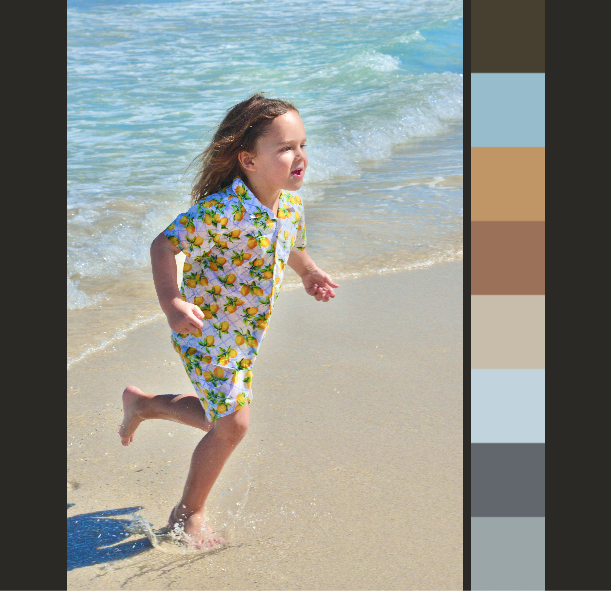
Last thing I want to touch on in this section is performance.
If you try resizing the app window and your image is large enough it will feel very sluggish. The issue is that, even though we have created the NSImage out of the CIImage right away once the image was dropped to the app window, the CoreImage graph doesn’t get executed at that point. It only gets executed when the image is rendered to the screen. That means that every time we resize the window all the bits of the input image are taken through the CIKMeans filter again, and as we already know, this filter is quite slow, not suitable for real time.
There are a few ways to mitigate this. The simplest one would be to cache some rendered representation of the CIImage output and then use that for display.
We can simply do that by adding one line of code that makes use of another helper method defined in ImageUtils.swift.
        self.outputImage = outputImage
            .settingAlphaOne(in: outputImage.extent)
        // Disable interpolation so that it maintains clear separation between colors
            .samplingNearest()
        // Blow up each pixel 50x
            .scaledUniform(50)
        // Make it vertical
            .rotated(.pi / 2)
        // Prerender so CPU it doesn't run the filter every time
        // the window resizes to improve resizing performance
            .rendered()?
            .asNSImage()
If you look under the hood you will see that this method creates a PNG data representation of the image:
    func rendered() -> CIImage? {
        guard let data = CIContext().pngRepresentation(
            of: self,
            format: .RGBA8,
            colorSpace: CGColorSpaceCreateDeviceRGB()
        ) else { return nil }
        return CIImage(data: data)
    }
The input image is run through the CIKMeans filter at that point which happens only once, right after the image was dropped to the app window. From then on whenever the window is resized all that is left to do is creating the PNG image from that data and rendering it to the screen.
If you run the app now and try to resize the window it will feel way smoother.
Getting More Colors
I’d like to get more colors than 8. Let’s set "inputCount" to 20 and see what happens.
    func processImage( _ ciImage: CIImage) {
        let outputImage = ciImage.applyingFilter("CIKMeans", parameters: [
            kCIInputExtentKey: CIVector(cgRect: ciImage.extent),
            "inputCount": 20
        ])
        ...
    }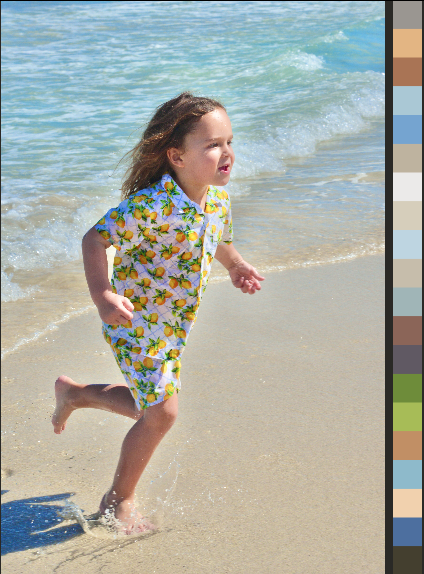
We got 20 colors as expected but the palette is starting to look jammed since a longer strip of pixels is getting fitted into the same height.
I’d like to maintain the size of the squares by folding the palette image into columns of the same height. Let’s create a helper function for that.
The output of the filter is horizontal. So we will fold it into rows which will become columns once the image is rotated for display.
The approach I have come up with is this: cut up the 1-pixel-high image into stripes of the equal length and composite these stripes into a new image by stacking them one below the other. And here is how the helper function will look like:
    func foldOnePixelHighImage(strideLength: Int = 8) -> CIImage {
        guard extent.height == 1 else {
            return self // 1
        }
        let imageLength = Int(extent.width)
        let xPositions = stride(from: 0, through: imageLength, by: strideLength) // 2

        var image = CIImage() // 3
        for (index, position) in xPositions.enumerated() {
            let length = min(imageLength - position, strideLength)
            guard length > 0 else { break }
            image = cropped(to: .init(x: position, y: 0, width: length, height: 1)) // 4
                .moved(to: .init(x: 0, y: index)) // 5
                .composited(over: image) // 6
        }

        return image
}- Bail by returning
selfif the image is not a 1-pixel-high image - Get starting positions of the stripes
- Start with an empty image
- Cut out the stripe
- Move it to where it should be in the folded image using the helper method I created earlier
- The resulting image will be a union of all the stripes we composited over each other
Now, all we have to do is to add a one liner modifier to the stack of operations we perform on the output of the filter (I am a fan of functional programming!).
func processImage( _ ciImage: CIImage) {
let outputImage = ciImage.applyingFilter("CIKMeans", parameters: [
kCIInputExtentKey: CIVector(cgRect: ciImage.extent),
"inputCount": 20
])
self.outputImage = outputImage
.settingAlphaOne(in: outputImage.extent)
.foldOnePixelHighImage()
// Disable interpolation so that it maintains clear separation between colors
.samplingNearest()
// Blow up each pixel 50x
.scaledUniform(50)
// Make it vertical
.rotated(-.pi / 2)
// Prerender so CPU it doesn't run the filter every time the window resizes to improve resizing performance
.rendered()?
.asNSImage()
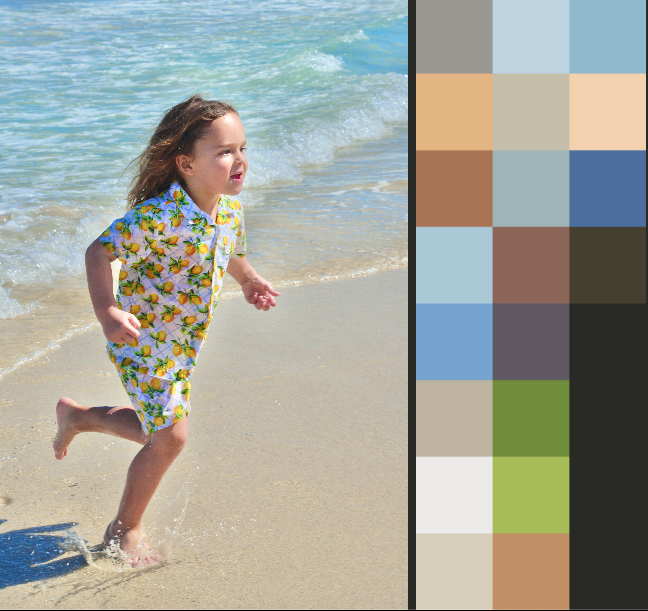
}I also realized that we need to rotate counter clock wise to make the columns go from left to right.
Run the app and see the result:
Adding Count Slider
To make this complete I’d like to add a slider to control the "inputCount" parameter instead of modifying it in the code.
Create an SwiftUI view InputCountView and add a slider to it:
struct InputCountView: View {
    private let range: ClosedRange<Double> = 0...128
    @State var value = 8.0
    var body: some View {
        VStack {
            Text("\(Int(value))")

            Slider(value: $value, in: range, step: 1) {
                Text("Input Count")
                    .font(.headline)
            } minimumValueLabel: {
                Text("\(Int(range.lowerBound))")
            } maximumValueLabel: {
                Text("\(Int(range.upperBound))")
            } onEditingChanged: { _ in
            }
        }
        .padding()
    }
}
For now the range is hardwired and the slider is manipulating the local state variable. Once we are happy with the UI layout we will connect it to the ImageProcessor.
Add it to the bottom of the VStack in the body of the ContentView :
var body: some View {
VStack {
if let image = viewModel.image {
HStack {
Image(nsImage: image)
.resizable()
.aspectRatio(contentMode: .fit)
if let outputImage = imageProcessor.outputImage {
Image(nsImage: outputImage)
.resizable()
.aspectRatio(contentMode: .fit)
}
}
} else {
Text("Drag and drop an image here.")
.font(.headline)
.frame(maxWidth: .infinity, maxHeight: .infinity)
.background(Color.gray.opacity(0.3))
}
InputCountView()
}
.onDrop(of: [.image], delegate: viewModel)
.onChange(of: viewModel.ciImage) { _, newValue in
if let newValue {
imageProcessor.processImage(newValue)
}
}
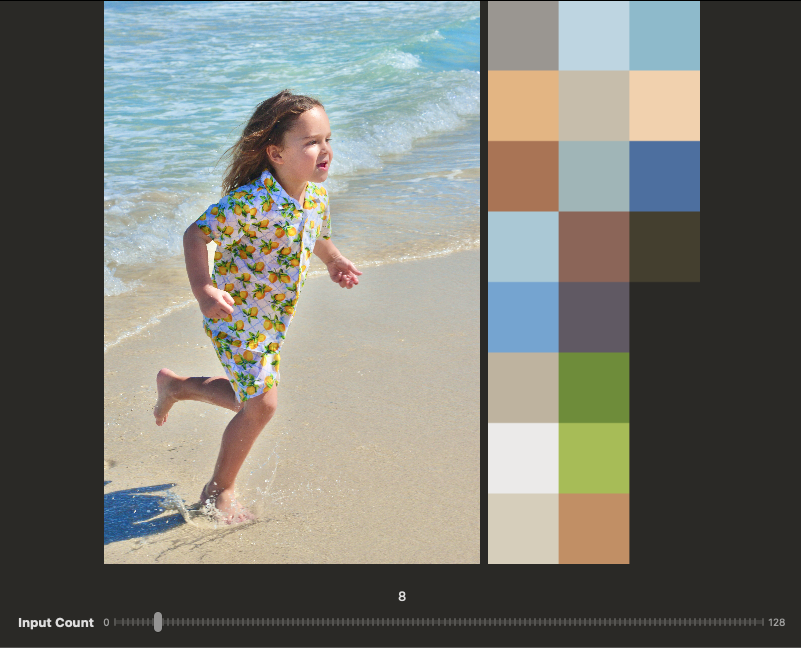
}If we run the app the slider looks rather huge. So let’s cap the width of the containing VStack at 800 pixels.
    var body: some View {
        VStack {
            ...
            InputCountView()
        }
        .frame(maxWidth: 800)
        .onDrop(of: [.image], delegate: viewModel)
        .onChange(of: viewModel.ciImage) { _, newValue in
            if let newValue {
                imageProcessor.processImage(newValue)
            }
        }
    }
Now we can start working on the plumbing that will connect the slider to the ImageProcessor.
Clearly we need to pass ImageProcessor to the InputCountView somehow. One way to do it is to add it as a parameter to the initializer. It’s safe to assume though that InputCountView is not the only view that might need access to it down the road. We might want to add more views with UI controls for other filter inputs and ImageProcessor will need to be passed to them as well.
Instead of passing it to every view we can add it to the ContentView environment. That way any view created by ContentView will (semi-)automatically have access to it.
At the top of ContentView change this line
@State private var imageProcessor = ImageProcessor()to this:
@Environment(ImageProcessor.self) private var imageProcessorThen add the object itself to the ContentView environment in all places where the ContentView is created. Specifically in #Preview section:
#Preview {
    ContentView()
        .environment(ImageProcessor())
}
and in KMeansDemoApp :
struct KMeansDemoApp: App {
    @State private var imageProcessor = ImageProcessor()
    var body: some Scene {
        WindowGroup {
            ContentView()
                .environment(ImageProcessor())
        }
    }
}
Now the InputCountView can easily gain access to it by adding this line to the top of the struct:
struct InputCountView: View {
    @Environment(ImageProcessor.self) private var imageProcessor
    private let range: ClosedRange<Double> = 0...128
    @State var value = 8.0
    var body: some View {
    ...
And to make it compile we should add it to the environment in the #Preview section
#Preview {
    InputCountView()
        .environment(ImageProcessor())
}
We will call ImageProcessor to process the input image when user releases the slider. Which means we have to cache the CIImage created form the dropped image in the ImageProcessor since InputCountView doesn’t have access to it. Let’s make that change:
class ImageProcessor {
    var outputImage: NSImage?
    var inputImage: CIImage? {
        didSet {
            processImage()
        }
    }

    func processImage() {
        guard let inputImage else { return }
        let outputImage = inputImage.applyingFilter("CIKMeans", parameters: [
            kCIInputExtentKey: CIVector(cgRect: inputImage.extent),
            "inputCount": 20
        ])
        self.outputImage = outputImage
            ...
            .asNSImage()
    }
}
Make matching change in the ContentView:
struct ContentView: View {
    @Environment(ImageProcessor.self) private var imageProcessor
    @State private var viewModel = InputImageViewModel()

    var body: some View {
        VStack {
          ...
        }
        .frame(maxWidth: 800)
        .onDrop(of: [.image], delegate: viewModel)
        .onChange(of: viewModel.ciImage) { _, newValue in
            imageProcessor.inputImage = newValue
        }
    }
}
We also need to add a count property to the ImageProcessor that the slider will be bound to. Also let’s make the count range a read only property of the ImageProcessor. We hardwire the numbers for simplicity but ultimately ImageProcessor could obtain the range from the CIKMeans filter.
class ImageProcessor {
    var outputImage: NSImage?
    var inputImage: CIImage? {
        didSet {
            processImage()
        }
    }
    var count: Double = 8
    let countRange: ClosedRange<Double> = 0...128

    func processImage() {
        guard let inputImage else { return }
        let outputImage = inputImage.applyingFilter("CIKMeans", parameters: [
            kCIInputExtentKey: CIVector(cgRect: inputImage.extent),
            "inputCount": count
        ])
        self.outputImage = outputImage
            ...
            .asNSImage()
    }
}
Now finish up by connecting it all together in InputCountView:
struct InputCountView: View {
    @Environment(ImageProcessor.self) private var imageProcessor
    private var range: ClosedRange<Double> {
        imageProcessor.countRange
    }
    var body: some View {
        VStack {
            Text("\(Int(imageProcessor.count))")

            Slider(value: Bindable(imageProcessor).count, in: range, step: 1) {
                Text("Input Count")
                    .font(.headline)
            } minimumValueLabel: {
                Text("\(Int(range.lowerBound))")
            } maximumValueLabel: {
                Text("\(Int(range.upperBound))")
            } onEditingChanged: { isEditing in
                if !isEditing {
                    // User released the slider
                    imageProcessor.processImage()
                }
            }
        }
        .padding()
    }
}
Notice the Bindable(imageProcessor).count construct on line 10. This is the only way we can create a binding to a property of an @Observable class which is accessed via @Environment.
Now run the app and drag the slider. The pallet should be updated every time you release the slider. Though, since the CIKMeans filter is quite slow, there is some noticeable delay before we see the change.
For better user experience would be nice to show some kind of a spinner while the filter is hard at work. We will address that in the next section.
But before we do that I’d like to address one issue that is bothering me. I am not quite happy with the fact that I had to use Double type for the count property on the ImageProcessor only because the Slider expect the value to conform to BinaryFloatingPoint. Even though it all works fine that way the correct type of that property has to be Int. Same goes for the countRange – it has to be a range over Int, not Double.
There is a way to fix it though.
First let’s change the types of the count and countRange properties to what they should be.
class ImageProcessor {
    var outputImage: NSImage?
    var inputImage: CIImage? {
        didSet {
            processImage()
        }
    }
    var count = 8
    let countRange = 0...128

    func processImage() {
      ...
    }
}
Obviously with that change InputCountView doesn’t compile any more. We somehow need to convert between Int and Double when passing parameters to the Slider. With the countRange it’s easy:
struct InputCountView: View {
    @Environment(ImageProcessor.self) private var imageProcessor
    private var range: ClosedRange<Double> {
        Double(imageProcessor.countRange.lowerBound)
        ...
        Double(imageProcessor.countRange.upperBound)
    }
With the binding property it’s a bit trickier but doable. We can make use of the Binding property wrapper that allows providing custom getter and setter like this:
    var body: some View {
        VStack {
            Text("\(Int(imageProcessor.count))")

            Slider(
                value: Binding(
                    get: { Double(imageProcessor.count) },
                    set: { imageProcessor.count = Int($0) }
                ),
                in: range,
                step: 1
            ) {
                Text("Input Count")
                    .font(.headline)
            } minimumValueLabel: {
                Text("\(Int(range.lowerBound))")
            } maximumValueLabel: {
                Text("\(Int(range.upperBound))")
            } onEditingChanged: { isEditing in
                if !isEditing {
                    // User released the slider
                    imageProcessor.processImage()
                }
            }
        }
        .padding()
    }
Now it’s way better and ensures a clean separation between the model and the view.
Showing Spinner
Let’s improve user experience a bit by showing a spinner while the filter is doing its work.
First create the view that will be used as an overlay to show the spinner.
import SwiftUI

struct ProcessingView: View {
    var body: some View {
        ZStack {
            Color.black.opacity(0.5).ignoresSafeArea()
            ProgressView {
                Text("Working...")
            }
        }
    }
}

#Preview {
    ProcessingView()
}
Add a property to ImageProcessor that will control the visibility of the spinner.
class ImageProcessor {
    var outputImage: NSImage?
    var inputImage: CIImage? {
        didSet {
            processImage()
        }
    }
    var count = 8
    let countRange = 0...128
    var isWorking = false

    func processImage() {
      ...
    }
In the ContentView conditionally show the ProcessingView as an overlay over the HStack that contains the input and the output:
    var body: some View {
        VStack {
            if let image = viewModel.image {
                HStack {
                    Image(nsImage: image)
                        .resizable()
                        .aspectRatio(contentMode: .fit)
                    if let outputImage = imageProcessor.outputImage {
                        Image(nsImage: outputImage)
                            .resizable()
                            .aspectRatio(contentMode: .fit)
                    }
                }
                .overlay {
                    if imageProcessor.isWorking {
                        ProcessingView()
                    }
                }
            } else {
                Text("Drag and drop an image here.")
                    .font(.headline)
                    .frame(maxWidth: .infinity, maxHeight: .infinity)
                    .background(Color.gray.opacity(0.3))
            }

            InputCountView()
        }
        .frame(maxWidth: 800)
        .onDrop(of: [.image], delegate: viewModel)
        .onChange(of: viewModel.ciImage) { _, newValue in
            imageProcessor.inputImage = newValue
        }
    }
Now ImageProcessor needs to set it to true before applying the filter and to false after assigning the outputImage property.
If we just do that:
    func processImage() {
        guard let inputImage else { return }

        isWorking = true
        let outputImage = inputImage.applyingFilter("CIKMeans", parameters: [
            kCIInputExtentKey: CIVector(cgRect: inputImage.extent),
            "inputCount": count
        ])
        self.outputImage = outputImage
            ...
            .asNSImage()

        isWorking = false
    }
we will never see the spinner. The issue is that everything between setting isWorking to true and then to false is executed synchronously and the SwiftUI never gets a chance to update the view in between.
So we need to make sure the RunLoop gets a chance to run at least once between setting the isWorking to true and starting the actual work.
We can easily do that by taking advantage of the Swift Concurrency.
First, let’s create a private async version of the processImage function:
    private func processImageAsync(_ image: CIImage) async {
        let outputImage = image.applyingFilter("CIKMeans", parameters: [
            kCIInputExtentKey: CIVector(cgRect: image.extent),
            "inputCount": count
        ])
        self.outputImage = outputImage
            .settingAlphaOne(in: outputImage.extent)
            .foldOnePixelHighImage()
        // Disable interpolation so that it maintains clear separation between colors
            .samplingNearest()
        // Blow up each pixel 50x
            .scaledUniform(50)
        // Make it vertical
            .rotated(-.pi / 2)
        // Prerender so CPU it doesn't run the filter every time the window resizes to improve resizing performance
            .rendered()?
            .asNSImage()

        isWorking = false
    }
And call this function from the Task block right after we set the isWorking property to true
    func processImage() {
        guard let inputImage else { return }
        isWorking = true
        Task {
            await processImageAsync(inputImage)
        }
    }
With that the spinner will be properly shown every time we release the slider.
Provide Seed Colors
In this section we will add the ability to pick the colors for the "inputMeans" parameter.
The colors need to be provided as a “string” of pixels – an CIImage 1 pixel high and K pixels long. So first thing we need to figure out is how to create such an image out of an array of colors.
It’s actually not that hard. For that we will crate a static helper function in CIImage extension that takes and array of colors and returns such 1 pixel high image.
    static func fromColors(_ colors: [NSColor]) -> CIImage {
        let pixels = colors
            .compactMap { CIColor(color: $0) } // 1
            .map { CIImage(color: $0) } // 2
            .map { $0.cropped(to: CGRect(x: 0, y: 0, width: 1, height: 1)) } // 3

        var image = CIImage() // 4
        for (index, pixel) in pixels.enumerated() {
            image = pixel.moved(to: .init(x: index, y: 0)) // 5
                .composited(over: image) // 6
        }

        return image
}- Transform the array of
NSColors to an array ofCIColors.CIColoris aCoreImageobject that represents a color in theCoreImagedomain to be used in conjunction withCIFilter,CIContextandCIImageclasses.CIColor(color:)is a failing initializer, so we need to usecompactMapto skip over nil objects. This implies that the dimensions of the created image may not match the size of the array if any of the given colors is invalid. - Transform the array
CIColors to an array of mono-colorCIImages of infinite extent. - Crop 1 pixel out of each such image.
- Stack pixels horizontally one after another. Start with an empty image.
- Move pixel to where it should be in the resulting image.
- Composite it over the image accumulated so far.
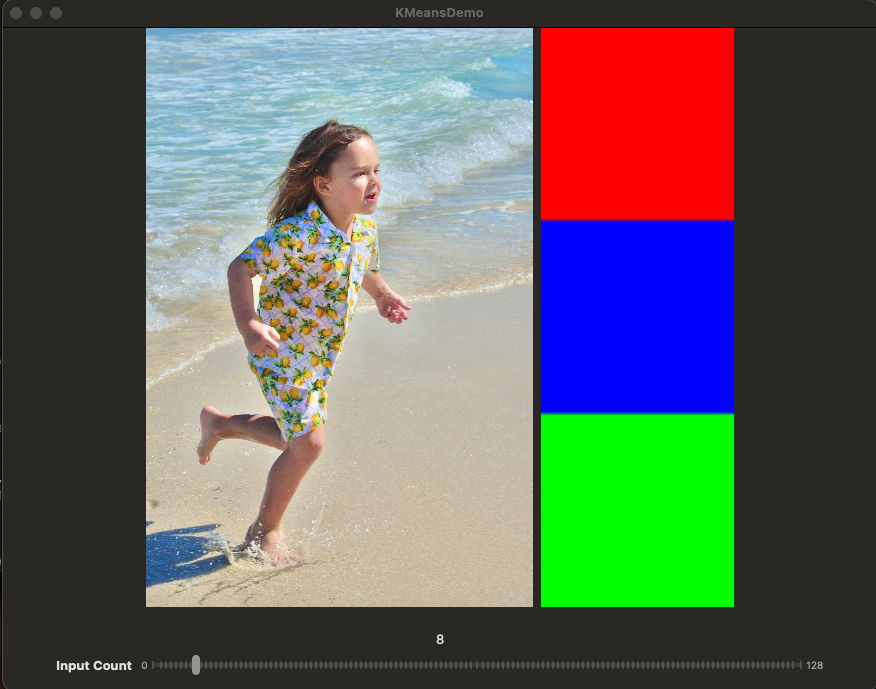
Since we already have the code to visualize 1-pixel high output of the CIKMeans filter we can quickly test out the new helper function by “rigging” our ImageProcessor like that:
    private func processImageAsync(_ image: CIImage) async {
//        let outputImage = image.applyingFilter("CIKMeans", parameters: [
//            kCIInputExtentKey: CIVector(cgRect: image.extent),
//            "inputCount": count
//        ])
        let outputImage = CIImage.fromColors([.red, .blue, .green])
        self.outputImage = outputImage
            ...
            .asNSImage()

        isWorking = false
    }
Run the app and drop any image on it. We should see the 3 colors stacked vertically on the right:
Undo the change in ImageProcessor, and let’s start working on the UI for picking colors.
My general idea for the UI is as following:
- Picked colors will be represented as squares laid out in a grid growing vertically
- Each square will have a delete button that shows up when square is hovered over. This will remove the color from the grid.
- Last square of the grid is an Add button. When clicked it will open the color picker to choose the next color that will be appended to the grid.
Let’s start with the view that will contain the grid of colors. I am thinking of using the LazyVGrid containing the ForEach loop iterating over an array of colors.
Create a SwiftUI view called ColorGridView like this:
struct ColorGridView: View {
    let colors: [NSColor]
    private let columns = Array(repeating: GridItem(.fixed(50)), count: 10)
    var body: some View {
        LazyVGrid(columns: columns) {
            ForEach(colors) { color in
                Color(nsColor: color)
                    .aspectRatio(1, contentMode: .fill) // Make it square
            }
        }
    }
}
This will show a grid of 50 x 50 color squares, 10 squares per row. We could do something more elaborate than fixing the count to 10 squares: we could make it dynamically shrink or grow along with the size of the window by making use of GeometryReader. But let’s keep it simple.
The code won’t compile right away because ForEach expects elements of the collection to conform to the Identifiable protocol and NSColor does not.
We can fix it by extending NSColor like that:
extension NSColor: Identifiable {
    public var id: ObjectIdentifier {
        ObjectIdentifier(self)
    }
}
Since NSColor is a class we can use ObjectIdentifier(self) to uniquely identify each instance.
This still won’t compile because we need to provide an array of colors to initialize the colors property. For ease of testing I created a helper function in an extension of NSColor that returns an array of random colors of given size.
extension NSColor {
static var random: NSColor {
NSColor(
red: .random(in: 0...1),
green: .random(in: 0...1),
blue: .random(in: 0...1),
alpha: 1
)
}
static func randomColors(count: Int) -> [NSColor] {
(0..<count).map { _ in NSColor.random }
}
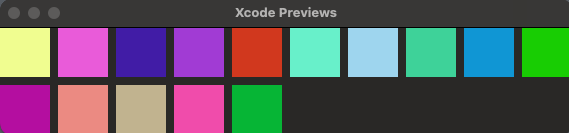
}With that I can choose any number of colors I want to be shown in preview:
#Preview {
    ColorGridView(colors: NSColor.randomColors(count: 15))
}
Now we can create the scaffolding for the InputMeansView that will eventually provide the controls for picking color seeds.
struct InputMeansView: View {
    var body: some View {
        HStack(alignment: .top) {
            Text("Input Means")
                .font(.headline)
            ColorGridView(colors: NSColor.randomColors(count: 15))
        }
        .padding()
    }
}

#Preview {
    InputMeansView()
        .frame(width: 800)
}
I added .frame(width: 800) modifier for preview so that it has enough room to show all the elements of the view (otherwise Input Means text will be pushed out).
Finally we can add this to the overall UI right below the InputCountView in the ContentView:
    var body: some View {
        VStack {
            if let image = viewModel.image {
                HStack {
                    Image(nsImage: image)
                        .resizable()
                        .aspectRatio(contentMode: .fit)
                    if let outputImage = imageProcessor.outputImage {
                        Image(nsImage: outputImage)
                            .resizable()
                            .aspectRatio(contentMode: .fit)
                    }
                }
                .overlay {
                    if imageProcessor.isWorking {
                        ProcessingView()
                    }
                }
            } else {
                Text("Drag and drop an image here.")
                    .font(.headline)
                    .frame(maxWidth: .infinity, maxHeight: .infinity)
                    .background(Color.gray.opacity(0.3))
            }

            VStack(alignment: .leading) {
                InputCountView()
                InputMeansView()
            }

        }
        .frame(maxWidth: 800)
        .onDrop(of: [.image], delegate: viewModel)
        .onChange(of: viewModel.ciImage) { _, newValue in
            imageProcessor.inputImage = newValue
        }
    }
I wrapped the input control views into VStack so that we could override the alignment by setting it to .leading and make them line up.
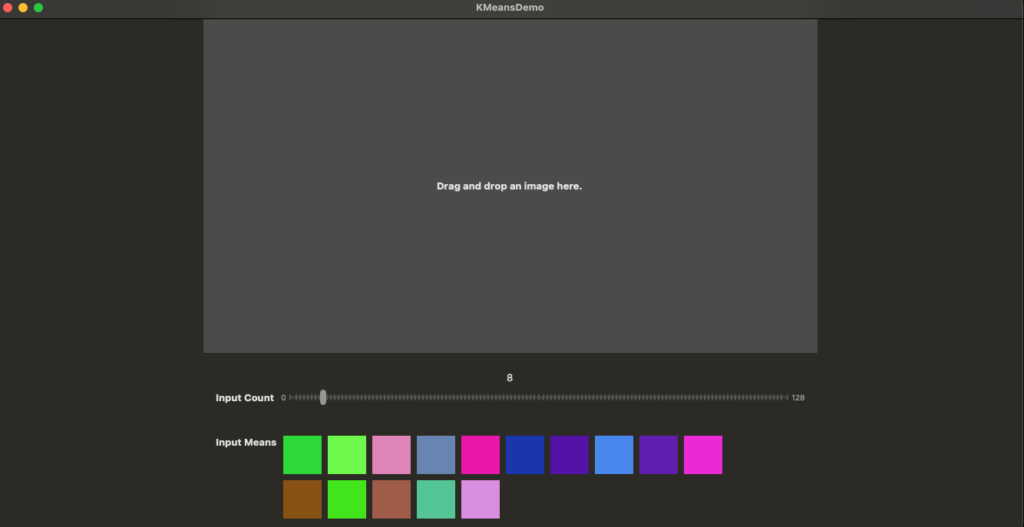
Run the app and you should see something like this:
Deleting Colors from Grid
Before we start working on that feature let’s move the color square into a separate custom view since we are going to add more stuff to it.
struct ColorSeedView: View {
    let color: NSColor
    var body: some View {
        Color(nsColor: color)
            .aspectRatio(1, contentMode: .fit)
    }
}

#Preview {
    ColorSeedView(color: .red) {}
        .frame(height: 50)
        .padding()
}
I changed contentMode to .fit which works better for a single square preview though it doesn’t really make a difference in the overall UI.
Make the matching change in ColorGridView :
struct ColorGridView: View {
    let colors: [NSColor]
    private let columns = Array(repeating: GridItem(.fixed(50)), count: 10)
    var body: some View {
        LazyVGrid(columns: columns) {
            ForEach(colors) { color in
                ColorSeedView(color: color)
            }
        }
    }
}
Overlay delete button over the color square
struct ColorSeedView: View {
    let color: NSColor
    var body: some View {
        Color(nsColor: color)
            .aspectRatio(1, contentMode: .fit)
            .overlay {
                Button {

                } label: {
                    Image(systemName: "minus.circle.fill")
                }
                .buttonStyle(.plain)
                // This will push it to the top right corner
                .frame(maxWidth: .infinity, maxHeight: .infinity, alignment: .topTrailing)
            }
    }
}
Make it appear only when you hover over the square:
struct ColorSeedView: View {
    let color: NSColor
    @State private var isHovering = false
    var body: some View {
        Color(nsColor: color)
            .aspectRatio(1, contentMode: .fit)
            .overlay {
                if isHovering {
                    Button {

                    } label: {
                        Image(systemName: "minus.circle.fill")
                    }
                    .buttonStyle(.plain)
                    // This will push it to the top right corner
                    .frame(maxWidth: .infinity, maxHeight: .infinity, alignment: .topTrailing)
                }
            }
            .onHover { over in
                isHovering = over
            }
    }
}
Add closure to be called when the delete button is pressed:
struct ColorSeedView: View {
    let color: NSColor
    let didTapDelete: () -> Void
    @State private var isHovering = false

    var body: some View {
        Color(nsColor: color)
            .aspectRatio(1, contentMode: .fit)
            .overlay {
                if isHovering {
                    Button {
                        didTapDelete()
                    } label: {
                        Image(systemName: "minus.circle.fill")
                    }
                    .buttonStyle(.plain)
                    // This will push it to the top right corner
                    .frame(maxWidth: .infinity, maxHeight: .infinity, alignment: .topTrailing)
                }
            }
            .onHover { over in
                isHovering = over
            }
    }
}

#Preview {
    ZStack {
        ColorSeedView(color: .red) {}
            .frame(height: 50)
            .padding()
    }
}
struct ColorGridView: View {
@State var colors: [NSColor]
private let columns = Array(repeating: GridItem(.fixed(50)), count: 10)
var body: some View {
LazyVGrid(columns: columns) {
ForEach(colors) { color in
ColorSeedView(color: color) {
// Delete color from grid
}
}
}
}
}You may have also noticed that I made the colors a @State var since we need to be able to modify it and want the view to reload automatically once the color is deleted from the array.
Add code to delete the color from the array:
struct ColorGridView: View {
    @State var colors: [NSColor]
    private let columns = Array(repeating: GridItem(.fixed(50)), count: 10)
    var body: some View {
        LazyVGrid(columns: columns) {
            ForEach(colors) { color in
                ColorSeedView(color: color) {
                    deleteColor(color)
                }
            }
        }
    }
}

private extension ColorGridView {
    func deleteColor(_ color: NSColor) {
        colors = colors.filter { $0.id != color.id }
    }
}
Last thing we want to do is to add an animation to it:
struct ColorGridView: View {
    @State var colors: [NSColor]
    private let columns = Array(repeating: GridItem(.fixed(50)), count: 10)
    var body: some View {
        LazyVGrid(columns: columns) {
            ForEach(colors) { color in
                ColorSeedView(color: color) {
                    withAnimation {
                        deleteColor(color)
                    }
                }
            }
        }
    }
}
And after trying it out I’d like to make it a bit snappier:
                ColorSeedView(color: color) {
                    withAnimation(.easeOut(duration: 0.2)) {
                        deleteColor(color)
                    }
                }
Picking Colors
We want to be able to pick a specific color if we want to as well as replace already picked color. Since we already have some colors to start from let’s start with the latter.
Adding ColorPicker in SwiftUI is super easy. Good place to add it would be the ColorSeedView.
We’ll do that with the following in mind: we’d like to create a chain of bindings so that the ColorPicker could modify the color directly inside the array of colors that resides in the ColorGridView.
First thing to do is to change the color property of the ColorSeedView from let constant to @Binding var:
struct ColorSeedView: View {
    @Binding var color: NSColor
    let didTapDelete: () -> Void
    @State private var isHovering = false
with the matching change in #Preview (.constant creates a binding to an immutable variable which is a useful shortcut normally used in previews)
#Preview {
    ColorSeedView(color: .constant(.red)) {}
        .frame(height: 50)
        .padding()
}
Project won’t compile any more since the ColorGridView currently passes an immutable color to the ColorSeedView instead of Binding<NSColor> that it now expects.
How do we bind to an element of an array? Turns out SwiftUI has a special syntax for that.
struct ColorGridView: View {
    @State var colors: [NSColor]
    private let columns = Array(repeating: GridItem(.fixed(50)), count: 10)
    var body: some View {
        LazyVGrid(columns: columns) {
            ForEach($colors) { $color in
                ColorSeedView(color: $color) {
                    withAnimation(.easeOut(duration: 0.2)) {
                        deleteColor(color)
                    }
                }
            }
        }
    }
}
We just need to add $ in 3 places like that. Now if the color is modified by the ColorSeedView it will be modified in place – directly inside the colors array.
Last thing to do is to add the ColorPicker to the ColorSeedView:
We can put it right on top of the color square like this (let’s not worry about the proper binding for now
)
    var body: some View {
        Color(nsColor: color)
            .aspectRatio(1, contentMode: .fit)
            .overlay {
                ZStack {
                    ColorPicker("", selection: .constant(Color(nsColor: color)))
                        .labelsHidden()

                    if isHovering {
                        Button {
                            didTapDelete()
                        } label: {
                            Image(systemName: "minus.circle.fill")
                        }
                        .buttonStyle(.plain)
                        // This will push it to the top right corner
                        .frame(
                            maxWidth: .infinity,
                            maxHeight: .infinity,
                            alignment: .topTrailing
                        )
                    }
                }
            .onHover { over in
                isHovering = over
            }
    }
}
We use labelsHidden modifier to make it centered (remove padding allocated by default for the label to the left of the picker). We also need to wrap it in a ZStack since now we have two views on top of each other – ColorPicker and the Delete button.
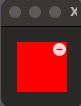
With that the color square with the color picker on top will look like this:
Ideally I wouldn’t want the border around the color picker to be visible. I’d prefer to be able to tap anywhere within the square to bring up the color picker panel, but I couldn’t figure out how to do it (if possible at all). So let’s just go with that.
Now we can take care of the binding part. Note the use of the Binding wrapper to do the conversion between the Color and the NSColor on the fly:
    var body: some View {
        Color(nsColor: color)
            .aspectRatio(1, contentMode: .fit)
            .overlay {
                ZStack {
                    ColorPicker("", selection: Binding(
                        get: { Color(nsColor: color) },
                        set: { color = NSColor($0) }
                    ))
                    .labelsHidden()

                    if isHovering {
                        Button {
                            didTapDelete()
                        } label: {
                            Image(systemName: "minus.circle.fill")
                        }
                        .buttonStyle(.plain)
                        // This will push it to the top right corner
                        .frame(
                            maxWidth: .infinity,
                            maxHeight: .infinity,
                            alignment: .topTrailing
                        )
                    }
                }
            }
            .onHover { over in
                isHovering = over
            }
    }
If you build and run the app and then click on any of the color squares, the color selection panel will pop up.
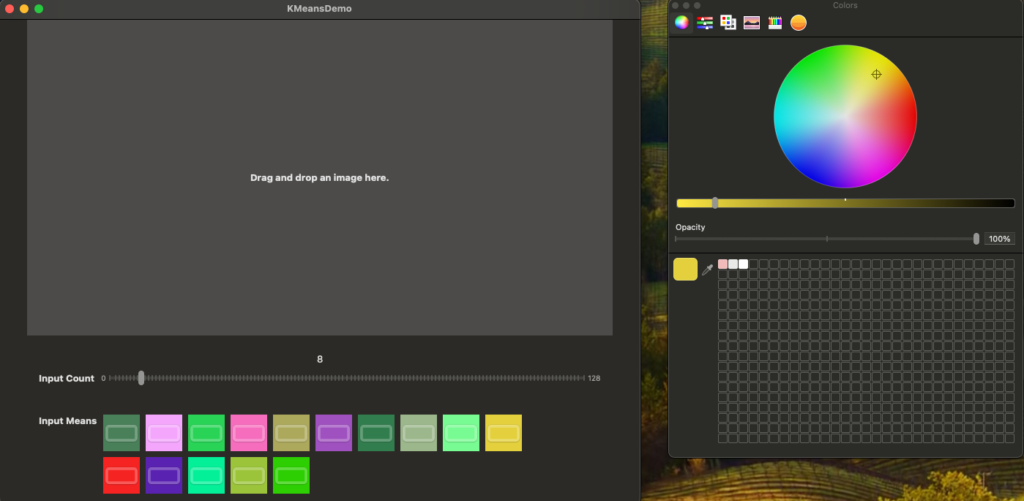
After playing with it for a bit you’ll notice one annoying thing: you won’t be able to keep changing color continuously (e.g. by dragging the cross hair cursor around the color wheel). The color square will change once and from then on it will stay “disconnected” from the color panel, not reflecting the subsequent color changes.
The problem lies in how we implemented modifying colors in place – by binding to the elements of the array. Under the hood such in place modification translates to swapping old element with a new one every time it’s changed. That means that every time we modify the color we also modify the array containing it, an since the array of colors is a @State property of the ColorGridView it triggers a complete reload of the view with every change. And that’s why the color square loses focus after the first change.
We tried to be cleaver with the bindings but ended up with a problem we now need to solve.
One way to solve it is to wrap every color in a data model of a reference type (e.g. a class). Then we can freely change the color without having to replace the element containing it, and the array itself will stay unchanged. This actually sounds like a more robust solution overall since we are isolating every color into a self contained object which can be mutated without affecting the state of the entire system.
Let’s create that wrapper class calling it ColorSeedViewModel:
import SwiftUI

@Observable
class ColorSeedViewModel: Identifiable {
    let id = UUID().uuidString
    var color: Color = Color(nsColor: .random)
}
We want it to be @Observable so that the view could react to the changes of the color property. We also make it conform to Identifiable right away since we are going to iterate over a sequence of them in ForEach loop.
Refactor ColorSeedView to be initialized with that view model instead of the raw NSColor
struct ColorSeedView: View {
    @State var viewModel: ColorSeedViewModel
    let didTapDelete: () -> Void
    @State private var isHovering = false

    var body: some View {
        viewModel.color
            .aspectRatio(1, contentMode: .fit)
            .overlay {
                ZStack {
                    ColorPicker("", selection: $viewModel.color)
                    .labelsHidden()

                    if isHovering {
                        Button {
                            didTapDelete()
                        } label: {
                            Image(systemName: "minus.circle.fill")
                        }
                        .buttonStyle(.plain)
                        // This will push it to the top right corner
                        .frame(
                            maxWidth: .infinity,
                            maxHeight: .infinity,
                            alignment: .topTrailing
                        )
                    }
                }
            }
            .onHover { over in
                isHovering = over
            }
    }
}

#Preview {
    ColorSeedView(viewModel: .init()) {}
        .frame(height: 50)
        .padding()
}
The viewModel has to be @State variable so that we could bind the ColorPicker to its color property on line 11.
Before we make any changes to ColorGridView let’s create a view model that will manage the array of colors instead of doing it directly in the view:
import SwiftUI

@Observable
class InputMeansViewModel {
    var seedViewModels = (0..<15).map { _ in ColorSeedViewModel() }

    func deleteColor(_ viewModel: ColorSeedViewModel) {
        seedViewModels = seedViewModels.filter { $0.id != viewModel.id }
    }
}
We want it to be @Observable so that the view could react to changes in the array, such as removing or appending elements (but not the changes of colors!).
Now we can make use of it in the ColorGridView:
struct ColorGridView: View {
    var viewModel: InputMeansViewModel
    private let columns = Array(repeating: GridItem(.fixed(50)), count: 10)
    var body: some View {
        LazyVGrid(columns: columns) {
            ForEach(viewModel.seedViewModels) { seedViewModel in
                ColorSeedView(viewModel: seedViewModel) {
                    withAnimation(.easeOut(duration: 0.2)) {
                        viewModel.deleteColor(seedViewModel)
                    }
                }
            }
        }
    }
}

#Preview {
    ColorGridView(viewModel: .init())
}
If we run the app now the behavior is exactly as we want: the color of any square can now be changed continuously without losing focus. And the software design looks much cleaner now.
Now we can delete Identifiable extension on the NSColor as well as the randomColors helper function – we don’t need them any more.
Adding Colors
To pick a new color we will add a button to the end of the color grid. When tapped it will append a random color to the grid which can then be customized with the color picker we already built.
Lay out the button:
import SwiftUI
struct AddColorButton: View {
var body: some View {
Rectangle()
.stroke(Color.gray, lineWidth: 2)
.frame(width: 50, height: 50)
.overlay {
Image(systemName: "plus")
.font(.system(.largeTitle))
.foregroundStyle(.gray)
}
}
}
#Preview {
AddColorButton()
.padding()
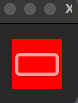
}This will create a view like this:

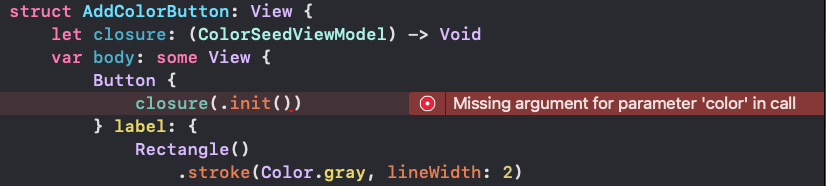
Wrap it in a Button and add a closure to return the ColorSeedViewModel for the new color.
struct AddColorButton: View {
    let closure: (ColorSeedViewModel) -> Void
    var body: some View {
        Button {
            closure(.init())
        } label: {
            Rectangle()
                .stroke(Color.gray, lineWidth: 2)
                .frame(width: 50, height: 50)
                .overlay {
                    Image(systemName: "plus")
                        .font(.system(.largeTitle))
                        .foregroundStyle(.gray)
                }
        }
        .buttonStyle(.plain)
    }
}

#Preview {
    AddColorButton(closure: { _ in })
        .padding()
}
Add the button to the end of the grid:
struct ColorGridView: View {
    var viewModel: InputMeansViewModel
    private let columns = Array(repeating: GridItem(.fixed(50)), count: 10)
    var body: some View {
        LazyVGrid(columns: columns) {
            ForEach(viewModel.seedViewModels) { seedViewModel in
                ColorSeedView(viewModel: seedViewModel) {
                    withAnimation(.easeOut(duration: 0.2)) {
                        viewModel.deleteColor(seedViewModel)
                    }
                }
            }

            AddColorButton { color in

            }
        }
    }
}

#Preview {
    ColorGridView(viewModel: .init())
}
You should see this in preview:

Add a method to the InputMeansViewModel to append the new color to the array of colors:
@Observable
class InputMeansViewModel {
    var seedViewModels = (0..<15).map { _ in ColorSeedViewModel() }

    func deleteColor(_ viewModel: ColorSeedViewModel) {
        seedViewModels = seedViewModels.filter { $0.id != viewModel.id }
    }

    func addColor(_ viewModel: ColorSeedViewModel) {
        seedViewModels.append(viewModel)
    }
}
And call it with animation:
struct ColorGridView: View {
    var viewModel: InputMeansViewModel
    private let columns = Array(repeating: GridItem(.fixed(50)), count: 10)
    var body: some View {
        LazyVGrid(columns: columns) {
            ForEach(viewModel.seedViewModels) { seedViewModel in
                ColorSeedView(viewModel: seedViewModel) {
                    withAnimation(.easeOut(duration: 0.2)) {
                        viewModel.deleteColor(seedViewModel)
                    }
                }
            }

            AddColorButton { color in
                withAnimation(.easeOut(duration: 0.2)) {
                    viewModel.addColor(color)
                }
            }
        }
    }
}
You should see some random color getting appended to the end of the grid every time you tap the plus button.
Now that we have an ability to add colors we don’t need to generate seed colors ahead of time – we can start with a clean slate as we should.
@Observable
class InputMeansViewModel {
    var seedViewModels = [ColorSeedViewModel]()

    ...
}
Passing Seed Colors to Filter
To close the loop we need to pass the seed colors to the filter. We already have a helper method to convert an array of colors to CIImage. We just need to call that method at an appropriate time and pass that CIImage to the ImageProcessor.
Let’s start with the latter.
First of all we need to add an optional property to the ImageProcessor to represent this input:
@Observable
class ImageProcessor {
    var outputImage: NSImage?
    var inputImage: CIImage? {
        didSet {
            processImage()
        }
    }
    var count = 8
    let countRange = 0...128
    var isWorking = false
    var inputMeans: CIImage?
Let’s also refactor it a bit by creating a separate method to build the parameters dictionary for the filter:
    private func parameters(inputImage: CIImage) -> [String: Any] {
        return [
            kCIInputExtentKey: CIVector(cgRect: inputImage.extent),
            "inputCount": count
        ]
    }

    ...

    private func processImageAsync(_ image: CIImage) async {
        let outputImage = image.applyingFilter("CIKMeans", parameters: parameters(inputImage: image))
        ...
    }
Now we can add new parameter to the dictionary:
    private func parameters(inputImage: CIImage) -> [String: Any] {
        var parameters: [String: Any] = [
            kCIInputExtentKey: CIVector(cgRect: inputImage.extent),
            "inputCount": count
        ]
        if let inputMeans {
            parameters["inputMeans"] = inputMeans
        }
        return parameters
    }
Add a method to the InputMeansViewModel that will convert seed colors to CIImage and invoke the ImageProcessor with it.
    func apply(imageProcessor: ImageProcessor) {
        let colors = seedViewModels.map(\.color).map { NSColor($0) }
        imageProcessor.inputMeans = CIImage.fromColors(colors)
        imageProcessor.processImage()
    }
All is left is to call the method from somewhere.
For starters let’s add an Apply button to the InputMeansView right below the label and call this method when the button is tapped:
struct InputMeansView: View {
@Environment(ImageProcessor.self) private var imageProcessor
let viewModel = InputMeansViewModel()
var body: some View {
HStack(alignment: .top) {
VStack(alignment: .leading) {
Text("Input Means")
.font(.headline)
Button("Apply") {
viewModel.apply(imageProcessor: imageProcessor)
}
}
ColorGridView(viewModel: viewModel)
}
.padding()
}
}
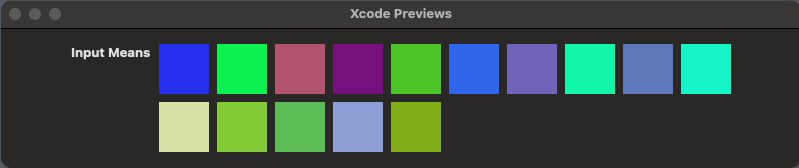
#Preview {
InputMeansView()
.frame(width: 800)
.environment(ImageProcessor())
}Run the app now, add a few colors and hit Apply. You should see as many colors to the right of the input image.
But did you notice that as soon as you do that all the seed colors you added before disappear? Same happens if you update the inputCount parameter by dragging the slider.
The problem is that the colors are managed by the InputMeansViewModel which is created by the InputMeansView every time the view itself is created (e.g. reloaded for display). And now that we added the @Environment(ImageProcessor.self) to it the view gets reloaded every time the ImageProcessor is mutated. This happens when any of its public properties are set which is what happens when we update the counter (set on inputCount var of the ImageProcessor) or hit Apply (that sets inputMeans var on the ImageProcessor).
This is one of the things to always watch out for in SwiftUI – understanding the life cycle of Views and what can trigger their reload which might be mind boggling at times with all these @Environment, @State, @Binding, @Bindable, @Observable` and etc… property wrappers all over the place.
There are two ways to go about solving that problem:
- Find a place where
InputMeansViewModelwould be created only once and giveInputMeansViewaccess to it somehow. We could follow the same pattern as withImageProcessor– make it an@Environmentobject created by the app when it’s initialized. We could, but this would violate the Separation of Concerns principle. TheInputMeansViewModelis something internal toInputMeansView(that’s why it’s created there), we don’t want anyone else to know about it and be responsible for its creation. - We could use the
ImageProcessoras a single source of truth for all configured inputs. We are already doing this for theInputCountView– when the view is created it reads theinputCountvalue from theImageProcessorto configure the slider. So let’s go with that approach.
For InputMeansView we can’t easily do this the way it is now. To read the colors back we would have to convert the inputMeans from CIImage back to the array of colors. While there is a way to do that (as you will see in one of my other posts) that seems to be an overkill. Instead we should simply pass the colors to the ImageProcessor as an array of colors and let it do the conversion to CIImage internally when it needs to configure the filter.
And if you think of it this will make it a cleaner design overall. We have already burdened the InputMeansViewModel with too much knowledge about the need to convert the colors to CIImage. It doesn’t really need to know anything about it. It should only be concerned with supporting the UI where the colors are picked and configured.
Starting with the ImageProcessor:
    var inputMeans: [NSColor] = []

    private func parameters(inputImage: CIImage) -> [String: Any] {
        var parameters: [String: Any] = [
            kCIInputExtentKey: CIVector(cgRect: inputImage.extent),
            "inputCount": count
        ]
        if !inputMeans.isEmpty {
            parameters["inputMeans"] = CIImage.fromColors(inputMeans)
        }
        return parameters
    }
Now we want to initialize the array of ColorSeedViewModels managed by the InputMeansViewModel from the inputMeans property of the the ImageProcessor: Which means that we need to pass the ImageProcessor to the InputMeansViewModel initializer:
It also means that the ColorSeedViewModel would need a custom initializer like this:
class ColorSeedViewModel: Identifiable {
    let id = UUID().uuidString
    var color: Color = Color(nsColor: .random)

    init(color: NSColor) {
        self.color = Color(nsColor: color)
    }
}
With that in place we can now refactor the InputMeansViewModel:
class InputMeansViewModel {
    let imageProcessor: ImageProcessor
    var seedViewModels: [ColorSeedViewModel]
    init(imageProcessor: ImageProcessor) {
        self.imageProcessor = imageProcessor
        seedViewModels = imageProcessor.inputMeans.map { .init(color: $0) }
    }

    func deleteColor(_ viewModel: ColorSeedViewModel) {
        seedViewModels = seedViewModels.filter { $0.id != viewModel.id }
    }

    func addColor(_ viewModel: ColorSeedViewModel) {
        seedViewModels.append(viewModel)
    }

    func apply() {
        let colors = seedViewModels.map(\.color).map { NSColor($0) }
        imageProcessor.inputMeans = colors
        imageProcessor.processImage()
    }
}
Finally we need to figure out how to get hold of the ImageProcessor to be able to pass it to the InputMeansViewModel initializer.
If you were thinking about something like this:
    @Environment(ImageProcessor.self) private var imageProcessor
    let viewModel: InputMeansViewModel
    init() {
        viewModel = .init(imageProcessor: imageProcessor)
    }
it won’t work. You’ll get an error:

This is because the View has to be fully initialized before it can access the @Environment object.
Looks like the only option is to ditch the @Environment approach and pass the ImageProcessor to the InputMeansView from outside.
struct InputMeansView: View {
    let viewModel: InputMeansViewModel
    init(imageProcessor: ImageProcessor) {
        viewModel = .init(imageProcessor: imageProcessor)
    }

    var body: some View {
      ...
    }
}

#Preview {
    InputMeansView(imageProcessor: .init())
        .frame(width: 800)
}
ContentView is where we are going to pass it from:
            VStack(alignment: .leading) {
                InputCountView()
                InputMeansView(imageProcessor: imageProcessor)
            }
If we try to compile now we’ll get an error in AddColorButton:
This is because now that we provided a designated initializer with the color parameter we have to spell out all other initializers we want to use:
class ColorSeedViewModel: Identifiable {
    let id = UUID().uuidString
    var color: Color

    init() {
        color = Color(nsColor: .random)
    }

    init(color: NSColor) {
        self.color = Color(nsColor: color)
    }
}
If we run the app now we should be happy with the observed behavior.
Last thing I’d like to do is add a little subtlety to the Apply button. Now it’s shown all the time. I’d like it to be shown only if there are new changes to be applied for inputMeans input, such as:
- Color was added
- Color was deleted
- Color was changed
First two are easy to track since we InputMeansViewModel has dedicated methods for them. We’ll get to the last one once we got the plumbing done.
To control the visibility of the Apply button let’s add a flag to the InputMeansViewModel:
class InputMeansViewModel {
    let imageProcessor: ImageProcessor
    var seedViewModels: [ColorSeedViewModel]
    init(imageProcessor: ImageProcessor) {
        self.imageProcessor = imageProcessor
        seedViewModels = imageProcessor.inputMeans.map { .init(color: $0) }
    }

    var hasChanged = false
And relay on that variable to conditional show the button in InputMeansView:
    var body: some View {
        HStack(alignment: .top) {
            VStack(alignment: .leading) {
                Text("Input Means")
                    .font(.headline)

                if viewModel.hasChanged {
                    Button("Apply") {
                        viewModel.apply()
                    }
                }

            }

            ColorGridView(viewModel: viewModel)
        }
        .padding()
    }
Now let’s go back to the InputMeansViewModel and set the flag to true when color is added or deleted and reset it back to false once the changes were applied:
    func deleteColor(_ viewModel: ColorSeedViewModel) {
        seedViewModels = seedViewModels.filter { $0.id != viewModel.id }
        hasChanged = true
    }

    func addColor(_ viewModel: ColorSeedViewModel) {
        seedViewModels.append(viewModel)
        hasChanged = true
    }

    func apply() {
        let colors = seedViewModels.map(\.color).map { NSColor($0) }
        imageProcessor.inputMeans = colors
        imageProcessor.processImage()
        hasChanged = false
    }
Let’s confirm that it works as expected by running the app.
Now, how do we track the changes to the individual colors? Neither ColorSeedView nor ColorSeedViewModel have access to the InputMeansViewModel and we want to keep it that way. These components should only be concerned with one single color and they don’t need to know where this color comes from. By isolating that knowledge from them we give ourselves the flexibility of using these components in a completely different context without any changes. Another instance of applying the Separation of Concerns principle to our software design (though maybe invoking the Single Responsibility principle is more appropriate in that context).
What we can do is listen to the onChange notification in the ColorSeedView and call back into the ColorGridView (or generally speaking whatever view has created it). The ColorGridView has access to InputMeansViewModel and can set the flag.
struct ColorSeedView: View {
    @State var viewModel: ColorSeedViewModel
    let didTapDelete: () -> Void
    let didChangeColor: () -> Void
    @State private var isHovering = false

    var body: some View {
        viewModel.color
            .aspectRatio(1, contentMode: .fit)
            .overlay {
              ...
            }
            .onHover { over in
                isHovering = over
            }
            .onChange(of: viewModel.color) { _, _ in
                didChangeColor()
            }
    }
}

#Preview {
    ColorSeedView(viewModel: .init(color: .red)) {} didChangeColor: {}
        .frame(height: 50)
        .padding()
}
struct ColorGridView: View {
var viewModel: InputMeansViewModel
private let columns = Array(repeating: GridItem(.fixed(50)), count: 10)
var body: some View {
LazyVGrid(columns: columns) {
ForEach(viewModel.seedViewModels) { seedViewModel in
ColorSeedView(viewModel: seedViewModel) {
withAnimation(.easeOut(duration: 0.2)) {
viewModel.deleteColor(seedViewModel)
}
} didChangeColor: {
viewModel.hasChanged = true
}
}
AddColorButton { color in
withAnimation(.easeOut(duration: 0.2)) {
viewModel.addColor(color)
}
}
}
}
}And that should do it!
I’d like to wrap this post up at that point. If you are interested you can add controls for two more inputs we haven’t touched: inputPerceptual and inputPasses. Given what we have done so far this should be a pretty straightforward exercise.